
With the change of the season and new life springing up all over here on the farm, I think it’s the perfect time to begin an EPP Temperature Quilt! Ever since discovering Jo Avery’s temperature quilt on social media last year, I’ve been dreaming of one day making one of my own.
This is the year! Would you like to join me?
Great! Because in this post, I'm going to share with you how to plan your very own EPP Temperature Quilt. I've provided everything you need right here, including simple instructions, a temperature quilt planner some suggested fabrics, and temperature quilt pattern ideas to get you started.
Let’s dive in.
What is a temperature quilt?
A temperature quilt is a quilt made from different color fabrics that track the daily high and low temperatures for a select period of time. An EPP temperature quilt is a temperature quilt made using the hand stitching technique known as English paper piecing.
Any length of time can be documented in a temperature quilt, so you can choose a time period as short or as long as you like. Most temperature quilts track daily temperatures for an entire year.
How do you start a temperature quilt?
Starting a temperature quilt is different than starting other types of quilts, primarily because temperature quilts take a bit more pre-planning than other types of quilts.
Besides the usual choices of patterns and fabrics, temperature quilts require a fabric color chart that matches the fabrics with the temperatures. They also require keeping track of daily temperatures over the course of the year.
Obviously, you'd need some sort of a system to collect all of this data so you can stay organized throughout the time it takes to make the temperature quilt. You could create your own fabric chart and monthly temperature charts if you want to.
However, I've already done the tedious work for you so you don't have to! I’ve put together The Ultimate EPP Temperature Quilt Starter Kit so you can get straight to planning and making.

Inside the Starter Kit, you’ll find everything you need to start planning your EPP temperature quilt, including planner pages with details instructions, a customizable fabric color chart, EPP templates, and coloring pages.
If you want to save yourself the time it would take to make your own planner then download the free EPP Temperature Quilt Starter Kit now. Then keep reading to learn step-by-step how to plan your temperature quilt.
I’m going to show you how to plan it out in just three simple steps. (You can follow this plan for any temperature quilt, btw. It doesn’t have to be an English paper pieced temperature quilt.)
Planning a Temperature Quilt
Planning a temperature quilt requires just 3 steps. First, you’ll track and log the temperatures in a chart. Then you’ll choose fabrics and finally, you’ll pick a pattern for your quilt. Let's take a look at each of these steps in more detail.
1. Track & Log Temperatures on a Chart
In order to know what color fabrics to choose, you must first decide on a few things like the location you’re going to track and the temperatures you’ll be working with. Then we can talk about fabric. So let’s cover the data first.
✔️ Pick A Location
Before you can start logging your temperatures, first you must choose the location you want to document in your quilt. It can be anywhere in the world - where you currently live, or any location on the planet that has special meaning to you, like the place you vacationed with your family a particular year, or maybe your favorite childhood home.
Once you’ve decided on the location, you must find out the total range of temperatures for that location. My favorite place to do this is on timeanddate.com. In the weather section, search for the location. Then look at each month of the previous year to determine the coldest and hottest temperatures.

This will give you an idea of the maximum range of temperatures your chosen location might experience. Once you have the highest and lowest temperature for the year you can determine how many fabrics you’ll need for your project.
As an example, at MakerJayne in Boulder, Colorado, the temperature ranged from -15°F to 100°F over the course of 2022.
Next, it’s time to decide how you want to divide that range up into fabric colors.
✔️ Make the Fabric Color Chart
What do I mean by this? Well… each fabric you choose is going to represent a pre-determined range of temperatures. It can either be a single temperature (36°F) or a range of temperatures (36°F to 40°F).
Your decision here will directly affect the number of fabrics you’ll use for your quilt. You’ll also use this information to create your own custom temperature quilt color chart.
Keep in mind, the more fabric colors you have in your temperature quilt, the more interesting the quilt will be.
For my example, I've chosen to use 5° increments because the range of temperatures for Boulder is so large. So for every 5°, I will be using a different fabric.

NOTE: Be sure to put all of the information you collect in a safe place because you’ll be coming back to it over and over throughout the year as you make your temperature quilt. The Ultimate EPP Temperature Quilt Starter Kit is the perfect place to do this.
For now, this color chart will just have the temperature increments for your total temperature range. We'll come back to it when we start talking about fabric selection below in the second step.
While we're on the subject of charts, though...
✔️ Begin Logging Daily Temperatures
You'll want to go ahead and begin logging the daily temperatures into another chart. I call this chart the monthly chart because it's organized by month. In this chart, you'll want to log the high and low temperatures for each day you're documenting. You can do this in real-time, or for any period from the past.
You can create a monthly chart in Google Sheets. Or you can use the monthly charts that are included in the starter kit. However you decide to log this data, keep it easy for yourself to access because you’re going to come back to these every single day.

You might also want to log any weather events on the same chart like rain, hail, sleet, or snow. Just keep in mind you’ll want to determine what you’re going to log upfront so you know what info to collect as you look at each day.
Okay, with all the data collection details out of the way, we can finally talk about fabric. Yay!
2. Choose Fabric for a Temperature Quilt
Choosing fabrics for a temperature quilt is one of the most enjoyable parts of the entire process! There are a plethora of fabric options to choose from for your temperature quilt. If you’re intimidated or overwhelmed by all the possibilities, have no fear. I’ve got several beautiful fabric recommendations for you below.
Fabric Color Chart
It's important to have your temperature quilt planner pages handy before you start choosing fabrics because you’re going to need to refer to the color chart you created in the previous step.
Take a look at your color chart. Count the number of groups of increments you have for the entire range of temperatures. This number will be the number of different fabrics you will need for the range of temperatures.

For my example, I need a total of 23 different fabrics to cover all my temperatures when I divided the total range by 5° increments.
How much of each fabric will you need for your temperature quilt?
It’s tough to say with any accuracy how much of each fabric you’ll need for your temperature quilt as it will depend on several things, like the timeframe you’re documenting, the size of the quilt you’re making, and the number of different fabrics you’re using.
Keep in mind, the more fabric colors you choose for your quilt, the less of each fabric you’ll need. Remember to write down the stock number information for each of the fabrics you choose just in case you run out and need to buy more.
For my temperature quilt, I’ve estimated I'll need about 1/2 yard of each fabric.
Note that the temperatures at the outer extremes will typically use less fabric. It only drops down to -15° here one or two days out of the entire year, and even that low of a temperature is rare. So you may not need as much fabric for the extremely hot and cold temperatures.
Recommended fabric bundles
I’ve gathered together several beautiful fabric bundles that would work great for a temperature quilt. Some are the more traditional bright rainbow of fabrics while others are less traditional. Some are solids and some are prints. Have a look at each of them and choose the one you like best.
- Bella Solids by Moda fabrics
- Kaffe Fassett Classics Rainbow by Free Spirit Fabrics
- Pastel Fusions by Robert Kaufman Fabrics
- Prism by In The Beginning Fabrics
- Warm and Cool Batiks by Hoffman Fabrics
- Dark Fusion by Art Gallery Fabrics
- Rainbow Blenders by various designers
- Rainbow Sherbet by Moda Fabrics
Add Fabrics to the Color Chart
Once you’ve got all your fabrics for your temperature quilt, it’s time to start adding them to the color chart we set up earlier.

To do this, cut out a small swatch from each fabric and glue it next to the temperature(s) you’ve assigned it to. This will be the color chart you will refer to every time you go to make a new block for your temperature quilt.
3. Select a Pattern Design
It’s finally time to decide on a pattern for your temperature quilt! This is the last step in the planning process.
There are endless possibilities for temperature quilt patterns! It’s exciting and maybe a bit unnerving if you’re not sure where to begin. To help reduce any overwhelm, I’ve got three pattern options that I've put together for you. Each design is based on the free hexagon templates I've included in The Ultimate Temperature Quilt Starter Kit and is designed with English paper piecing in mind.
Feel free to use any one of these quilt pattern ideas for your temperature quilt. Or use them as inspiration to come up with your own!
Quilt Pattern Option #1: Wavy Hexie Columns
In this option, I’ve arranged the hexagons by month in vertical columns that zig-zag or wave from left to right. Each black hexagon within the wavy columns represents the beginning of a new month.

Quilt Pattern Option #2: Straight Hexie Rows
This option is similar to the one above but instead of arranging the months vertically, they are arranged horizontally. Again, each of the black hexagons represents the start of a new month.
The rows in this design are not wavy because the hexagons are arranged "on-point". If you wanted to make wavy rows all you'd need to do is turn the hexagons so they're flat side up, instead of point up.
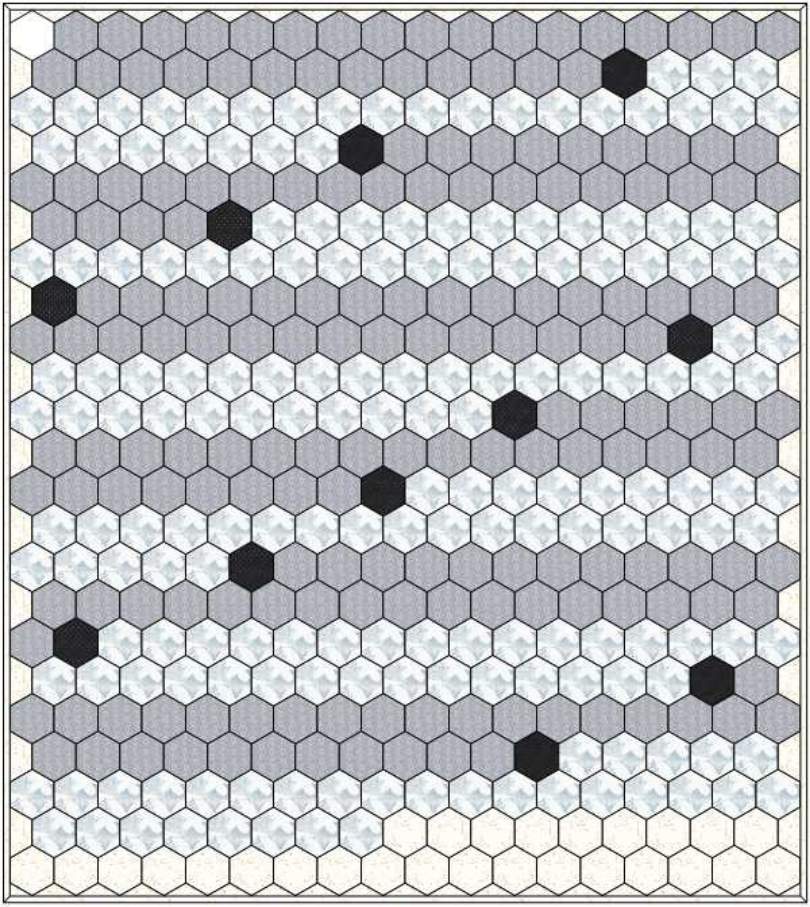
Quilt Pattern Option #3: Diagonal Hexie Rows
This is the pattern option I’ve chosen for the temperature quilt I’m making this year. I’m going to start in the upper left corner and create diagonal rows across to the lower right corner. Each day will be a double-half-hexagon block with a solid-hexagon block marking each month’s beginning.

With each of these temperature quilt pattern options, you can start on any side you want, right or left, top or bottom. Feel free to adjust the overall placement of your blocks for a more symmetrical look to your quilt if that pleases you.
Pattern Size
If you decide to use any of my temperature quilt pattern ideas, I also want to offer you a way to customize the size. So here is my hack for creating different quilt sizes using the free templates found inside The Ultimate Temperature Quilt Starter Kit.
When you use those templates and any one of the above layouts, you’ll end up with a quilt that is about 63 x 71 inches finished. This is 10 inches shorter than a twin-size quilt. By adding a wide strip of fabric to the top and bottom you can create an actual twin-size quilt that finishes around 63 x 81 inches.
To make an even larger quilt (like a queen or even a king size), all you need to do is add borders on all four sides. For example, by adding 7-inch borders all the way around you’d end up with a quilt that is about 79 x 90 inches ( a good starting point for a queen-size quilt).

If you don’t like the look of thick borders around the outside of your quilt, another option for a larger quilt is to add more hexagon blocks around the outside. These can be solid hexagons or the same double-half-hexagon blocks used for the daily temperature blocks.

You could even get more creative and add some fun designs using different colored hexagons along the sides to act as a frame for the months.
Like I said, there are endless options. So have fun with this step!
Summing It All Up
Planning a temperature quilt is simple when you use these three steps: Logging temperatures, choosing fabrics, and selecting a pattern design.
With this article and The Ultimate EPP Temperature Quilt Starter Kit, you have everything you need to start planning your temperature quilt.

In a future article, I’ll be sharing How to Make an EPP Temperature Quilt so if you’d like to join me in making one this year download the free starter kit, print the planner pages, and begin planning out your temperature quilt today. Once you get your temperature quilt planned out, you’ll be ready to start making it. Super exciting!
Join us in the private Facebook Group and share your EPP temperature quilt adventures with the rest of us! We'd love to have you.
Want More Inspiration?
Subscribe to our newsletter to get free patterns, tutorials,
updates, and inspiration delivered right to your inbox.


