Are you ready to grow your English Paper Piecing fussy cutting skills? Then this post is for you!
In this third installment of Flowers & Butterflies, we are exploring fussy cutting. Below I'll be sharing more about the pattern, including how you can get the pattern and participate in the stitch-along! Let's dive in.
Flowers & Butterflies is an EPP pattern series designed to help you develop and build your English paper piecing skills one pattern at a time.
The series began with the basics of English paper piecing, expanding from there to exploring various EPP shapes and the nuances of basting and stitching them.
Now we're moving on to fussy cutting!
New to the series? Start here.

What is fussy cutting?
Fussy Cutting is an English paper piecing technique in which a very specific motif on fabric is cut out allowing you to showcase it in your quilt. This technique opens up a whole new dimension for EPP creativity.
By intentionally cutting fabric to feature a specific part of a design and then arranging those fabric cuts into an English paper piecing pattern, new and unexpected patterns emerge!
It’s called ‘fussy’ cutting because of the selective way in which the fabric is cut.
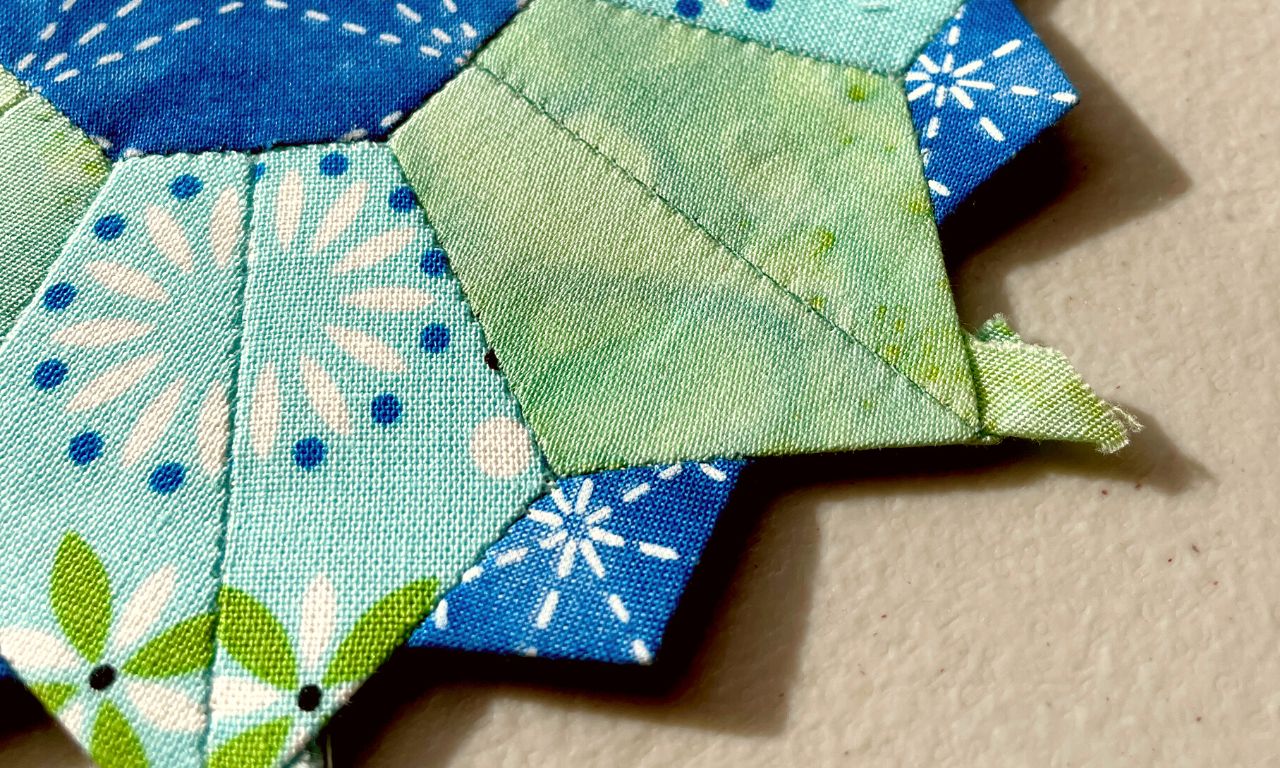
Rather than indiscriminately cutting out fabric, fussy cutting involves looking closely at a fabric’s design and selecting sections or motifs within that design to highlight or emphasize within your English paper pieces.
Fussy cutting takes careful thought and planning to achieve a successfully fussy-cut English paper pieced project.
If you’ve been following the series and want to
get straight into Pattern #3, scroll down this page.
New to the series? Get the first pattern FREE!
Skill-building Pattern #3
In the fussy cutting pattern, you get to play with fabric colors, values, and motifs to create stunning and dynamic English paper-pieced flowers and butterflies.

The pattern includes detailed instructions, step-by-step assembly diagrams, and template sheets in three different sizes for both the flower and butterfly.
So if you enjoy cutting your own templates all you need is the pattern, the templates, and some fussy cuttable fabric.
There are four stitch-along videos that will go with this pattern. The links to each video will be posted below as they are released.
Let’s get started!
Step 1. Get the pattern
The PDF pattern can be viewed on any computer or mobile device and printed as needed.

Step 2. Get the templates
You have two options for getting your templates.
- Cut your own templates using the template sheets included inside the PDF pattern.
- Purchase pre-cut paper templates.

Fussy Cutting Flower Templates
 Fussy Cutting Butterfly Templates
Shop for templates here.
Step 3. Connect
The private Facebook Group is the place to share your Flowers & Butterflies makes with all the others who are participating in the stitch-along. You can also ask questions, get feedback, and connect with fellow EPPers, too!

Step 4. Watch the videos
Posted below will be each of the stitch-along videos. Each one will cover one of the following topics: pattern overview & fabric discussion, flower assembly, butterfly assembly, and project assembly. The link to each video will be posted below as it is released.
Fussy Cutting Pattern Overview
In the first video, I give a brief overview of the pattern. This video will help you get your templates ready for assembly.
You'll get to see what the finished flowers and butterflies look like in all three sizes so you can better decide which size to make. You'll also learn how to choose the best fabrics for fussy cutting and see some of my top recommended fussy cutting tools.
Flower Assembly
In this video, you'll learn step-by-step how to fussy-cut fabric for English paper piecing and how to baste and assemble the flower design. You'll also learn what some of my favorite fussy-cutting tools are and how to use them.
Butterfly Assembly
You'll learn how to fussy-cut fabric for the butterfly design and how to baste and assemble the butterfly step by step. You'll also get to see some of my favorite fussy cutting tools in action as I walk you through my process of using them.
Project Assembly
Finally, in the last video for this pattern, I walk you through the process of turning your flower or butterfly into a beautiful wall display using some fabric, thread, and an embroidery hoop.
It's a super quick project that is perfect for giving as a gift or decorating your own wall with. I think you're going to love it!
Step 5. Share Your Experience
If you’re participating in this EPP skill-building stitch-along, we’d love to hear from you!
Join the private Facebook Group, share a photo, and leave a comment on what new skill you’ve learned or old skill you’ve seen improvement in while stitching the patterns in this series.
Next Time
In the next blog post, I’ll be sharing How to Choose the Best Fabric for Fussy Cutting. So stay tuned! Subscribe to my newsletter to get notified when I publish future posts.
Want More Inspiration?
Subscribe to our newsletter to get free patterns, tutorials,
updates, and inspiration delivered right to your inbox.